 But first, a word on the layout of a photo studio.
by Gail Berg
There are a number of reasons to want to set up an indoor photo studio, including: taking portraits, photographing still life, insurance/reference shots of "small" items, and more.
This article will emphasis setting one up for photo showing purposes, recreating the outdoors.
I have tried to point out a number of (health, physical) concerns when creating, setting up or utilizing a photo studio. I cannot identify every hazard as each studio is unique, but recommend reading and following all safety instructions. Using common sense is always recommended, and adult supervision (as applicable).
In photoshowing, the main purpose is to try and capture a photo that looks as much like a "real" horse, posed or in action.
The three main things that will be discussed are the background, footing and lighting.
But first, a word on the layout of a photo studio.
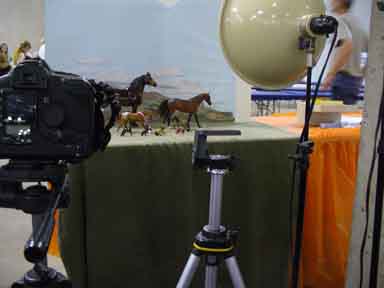
Ideally the height of the table that is used as the studio is such that you can be seated (or standing or kneeling), comfortably (without leaning forward/over), to look through the camera (on tripod, or holding) at about horse's eye-level. For most people, this means a low stool at normal (36") table height.
Trying different heights and distances from the "edge" of the table to the camera are suggested until you find one that works best for your situation.
You want to have a deep enough (distance from camera to background) studio that a horse can be positioned so any shadow (from lights or flash) does not appear on the background. (Unless of course, you're shooting as if the horse is posing after winning awards at a show against a curtain.) In addition, you want the studio deep enough that you can focus on the horse in the foreground and the background be indistinct (out of focus); I often use f4.5 or so when taking studio shots.
If photographing for performance, more depth and/or width is recommended. This will provide room to set up the obstacles in a realistic distance based on scale (rather than having to "squeeze" as sometimes happen on a live show table). (To increase the effect of distance, smaller-scale props can be set up further back to make it look farther away.)
For simple halter shot, for 1/9th (traditional) scale about 3' is a minimum depth (perhaps 3' wide, with backdrop up to 3' high). Performance could use up to 6' foot depth (could be multiple tables together; perhaps 6' width and backdrop up to 4' high). If using multiple tables, a covering (old sheet) is recommended to allow the footing to be spread over the tables and not escape down any crack between them.
One of the most obvious things in a photograph is the background. Backgrounds fill most of the image (where the horse isn't).
The biggest rule of thumb for backgrounds is that it should not draw the eye away from the horse (i.e., be distracting).
How big the background needs to be depends on the distance from the camera (and somewhat the size of the horse).
For simple halter shot, for 1/9th (traditional) scale about 3' is a minimum depth, perhaps 3' wide, with backdrop up to 3' high. Performance could use up to 6' foot depth (could be multiple tables together); perhaps 6' width and backdrop up to 4' high.
If using a landscape (mural or painting or poster) as the background, a suggestion is that the upper half or more be sky (for a really "far" distance). Some good examples of this are many railroad backgrounds.
If using a photograph, you need to position lights (or utilize flash) so that it doesn't reflect on the print (hopefully non-glare finish). I do recommend affixing any paper (poster, photograph) to posterboard or other stiff material to keep it flat and prevent curling edges.
To keep the backdrop upright, one easy way is to set up against a wall (or window) and lean it against that. But a heavy backing may "slip" forward; I counteracted this by designing a stand with a base that included some stops that prevent the backdrop from slipping. (Note to self, take picture.)
Footing is the material "on the ground" that the horse is standing in or moving through. When thinking about what might be used, think about what a horse might be walking on when photographed. Those include:
Using the exact same material as a real horse for model photography is not recommended as the size/scale does not work well (makes the photo look fake). Many of the materials best suited can be found at a local model railroad or hobby shop.
Many of these items (or creating them) require items that should only be done by adults or only with adult supervision. Read and follow all instructions. Safety is important.
Sometimes you have a horse that is mounted on a base and you need to find footing that can cover/hide the stand/base. So that may have a bearing on what material is used. Hard surfaces cannot be modified to hide base/stand. Some soft surfaces, such as a sheet, have to be permanently modified to fit around the bottom of a horse's foot to hide the base/stand. It is best if you have a "loose" material that can be moved to cover a base.
| Material | Model scale equivalent | Comments |
|---|---|---|
| Asphalt | Scale "sheet" | |
| Spray paint "stone" finish | ||
| Concrete | Scale plastic "sheet" | |
| Spray paint "stone" finish | ||
| Dirt | Coffee, tea grounds | Pungent if used "new". |
| Potting soil | ||
| Felt, fabric(brown, tan) | More appropriate for live showing. | |
| Grass | Mat sheet with "grass" | |
| Felt, fabric (green - various shades) | More appropriate for live showing. | |
| Gravel | Kitty litter (small "old style" clay) | If left set up, your cat could mistake it for a new (or cleaner) litter box. |
| Hay | Hamster bedding | |
| Rubber | Scale sheet | |
| Silicon material | ||
| Sand | Kitty litter (scoopable - make sure to get the type without "color"/smell pellets) | If left set up, your cat could mistake it for a new (or cleaner) litter box. |
| Powdered milk | My (now angel) cat loved to lick this when I left it out. | |
| Felt, fabric (tan, cream) | More appropriate for live showing. | |
| Sawdust | Fine shavings | If left set up, your cat could mistake it for a new (or cleaner) litter box. |
| Snow | Scale "sheet" | |
| Felt, fabric (white) | More appropriate for live showing. | |
| Cotton (balls that can be pulled apart, batting that can be rolled out) | ||
| Poly-fill (for pillows, similar qualities to cotton) | ||
| Kitty litter (clear crystals) | If left set up, your cat could mistake it for a new (or cleaner) litter box. | |
| Water, still | Blue plastic | |
| Clear epoxy | ||
| Clear-drying (white) glue | OK for thin layers, but not as predictable as epoxy. | |
| Water, moving | Clear epoxy |
And think about any "dust" that would kick up from moving through a ground cover (or the splash from water). For white, I've seen wisps of cotton; for brown/tan, handful of mohair.
Using an old sheet or table cloth to cover the table(s) when using loose footing is recommended. When storing the footing material after use, it's sometimes easier to get it back in the container "pouring" it from the sheet. And also good if the footing is covering multiple tables not to lose some slipping down between tables that don't fully abut each other.
 If you have a studio that can be set up next to a window with great outdoor light, and you are at home during the limited morning and afternoon hours to take advantage of that light, you never have to worry about lighting your studio.
The rest of us will have to make due with artificial light in the form of lights/lamps and flash.
One thing to remember when using artificial light is to compensate for the color correction. Incandescent lights give off a yellow hue; fluorescent lamps give off a green hue. Eyes automatically "adjust" to know white is white, but a camera does not. You either need to get a filter to attach to the lens (which reduces the amount of light the camera sees, resulting in longer exposures, or larger aperture openings) or on a digital camera use "white balance" adjustments compensate.
Shown in the photo are three lights which consist of adjustable light stands (the vertical part which has a tripod base), reflector (tan on this side, metallic on the bulb side), the socket (which screws into the reflector and holds the bulb providing power) and the bulb. (Amazon has a set of three studio lights with travel case here, excluding bulbs.) Unlike normal table tables or floor lamps which might "max out" at 100 watts, the wattage in photo sockets can be rated to 500w or more (nice and bright, and very hot; similar power drain as a hair dryer).
If you have "tall" items appropriately set up, you might be able to utilize reflectors attached on spring clamps to shed light on the studio. But adjust so there is nothing touching reflectors and plenty of air to circulate.
Safety notes: When buying lamp sockets, make sure you understand the wattage limitations and make sure any outlet you plug into can handle the power usage; otherwise you might trip a breaker or start a fire. Please ensure that there are no shorts or "bare spots" on the cords (another fire potential starting spot). And don't forget to tape down cords in traffic areas so no one trips.
You can use "regular" floor and table lamps, but as the light is generally not as bright, you may have to adjust your camera to take "long" exposures. This requires a tripod, and a semi-automatic/manual camera.
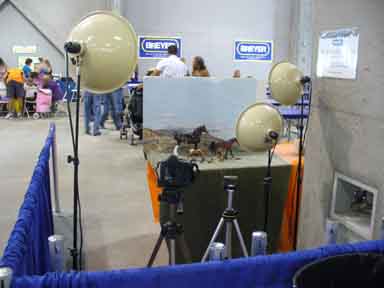
Ideally, you can find three lights and set them similar to as shown at left. The left-most light is set up to provide general overall lighting to the scene. The right-most (highest-adjusted) light is set up to provide addition overall lighting of the scene. And the third light is set to provide the "glint" of life in a horse's eye.
For reference shots, a light "box" can be used which as exterior lights that diffuse through the box. This can be nice if taking photos of glossy horses where the lights might otherwise bounce off.
If taking reference shots, or "indoor" shots (such as in front of curtain at a show), a flash might be used. It's a bit more difficult to get the light to "glint" in a horse's eye with a flash
This article looks at some of the issues of positioning lights for portrait photography.
previous | continue
![]() Back up to Library
Back up to Library
![]() Return to the Model Horse Gallery Home Page
Return to the Model Horse Gallery Home Page
This page maintained by the Model Horse Gallery Curator ©2010-2020